
claude-for-researchers
Practical guide and toolkit for physicists and mathematicians using Claude Code — built from months on a real research project
Install with your AI
Paste into Claude Code, Cursor, or any agent — it reads the repo and wires the tool into your project.
Install and set up claude-for-researchers (release-binary project) into my current project.
Found on https://claudeers.com/claude-for-researchers
Repo: https://github.com/Mexregkan/claude-for-researchers
Homepage/docs: —
Detected install method: release-binary → inspect the README
Category: other. Platforms: cli, api, desktop, web.
Read the repo's README for exact setup and env vars, then install it and wire it into my project.

Claudeers Health Verdict:
active; community-verified: false. Confirm the source before running anything.
Grab the latest release asset from GitHub.
# download a build from https://github.com/Mexregkan/claude-for-researchers/releases
git clone https://github.com/Mexregkan/claude-for-researchers
// compatibility
| Platforms | cli, api, desktop, web |
|---|---|
| Operating systems | — |
| AI compatibility | claude |
| License | — |
| Pricing | open-source |
| Language | Python |
Claude for Researchers
A practical guide and toolkit for researchers — especially physicists and mathematicians — who want to use Claude Code productively on long, technically demanding projects.
This guide is written from real experience running a months-long mathematical research project with Claude Code, not a weekend experiment. It covers what works, what wastes time, the failure modes you will hit, and how to set up a workflow that survives them.
What this guide is not. There are other projects focused on getting Claude to conduct research autonomously — literature surveys, hypothesis generation, paper drafting. This is not that. The goal here is to give you a well-structured workspace and a reliable workflow so that you can do the research faster and more cleanly: less time on housekeeping, better continuity across sessions, fewer mistakes from working in a big messy codebase. Claude is the tool; you are the researcher.
Version 2026.06 — see CHANGELOG.md for recent updates. If you
set up a project from an earlier copy, the changelog tells you what is worth
re-copying from starter/.
How to read this guide
This guide serves two audiences at once, so it is organised in parts:
- Never used Claude Code? Read Part I from the top. It takes you from nothing to a fully configured project — including a step where Claude does the setup for you. Then read Part II gradually, as the topics become relevant to your work. You do not need anything in Part III to be productive.
- Already using Claude Code? Skip Part I (except perhaps Bootstrapping, which is useful for any new project) and start with Part II — the workflow patterns there are the heart of this guide. Add the machinery in Part III when you want it.
- Everyone, whatever your experience level: read Honest limitations before trusting anything Claude produces. The failure modes described there are not edge cases.
Part I: Getting started
New to Claude Code? Start here. By the end of this part you will have a working installation and a fully configured research project — most of it set up by Claude itself. Experienced users can skip ahead to Part II.
Installation and first launch
This section is for readers who have never used VS Code or Claude Code before. If you are already set up, skip to Bootstrapping a new project with Claude.
What you need
- A computer running macOS, Windows, or Linux
- An Anthropic account (the same account you use for Claude on the web)
- A Claude Pro subscription or API credits — Claude Code uses your API account
You do not need to know anything about terminal commands or configuration files to get started. This guide walks through each step.
Step 1 — Install VS Code
VS Code is a free text editor made by Microsoft. Claude Code runs inside it as an extension. You can also run Claude Code in a standalone terminal, but VS Code gives you a much better experience: you see the files Claude is editing, the terminal where it runs, and the chat window all in one place.
- Go to https://code.visualstudio.com and click the download button for your operating system.
- Run the installer. On macOS, drag VS Code into your Applications folder. On Windows, the installer does everything for you.
- Open VS Code. You will see a welcome screen. You can close it.
That is all. You do not need to configure anything in VS Code before continuing.
Step 2 — Install the Claude Code extension
- In VS Code, click the Extensions icon on the left sidebar (it looks like four squares, one slightly detached).
- In the search box that appears, type
Claude Code. - The first result should be "Claude Code" by Anthropic. Click Install.
- After installation, a Claude icon appears in the left sidebar.
Alternatively, you can install Claude Code as a command-line tool and use it from any terminal without VS Code:
npm install -g @anthropic-ai/claude-code
This requires Node.js to be installed. The VS Code extension is easier if you are not familiar with the terminal.
Step 3 — Sign in
- Click the Claude icon in the VS Code sidebar.
- Click Sign in with Anthropic.
- A browser window will open. Sign in with your Anthropic account.
- After signing in, return to VS Code. You should see a chat interface.
If you are using API credits instead of Claude Pro: in the sign-in screen, choose Use API key, paste your key from console.anthropic.com/settings/api-keys, and confirm.
Step 4 — Open your project folder
Claude Code works on a folder, not a single file. It reads the files in your project folder and makes changes to them.
- In VS Code, go to File → Open Folder (macOS: File → Open...).
- Navigate to your research project directory and open it.
- VS Code will show your files in the left sidebar under "Explorer."
If you do not have a project folder yet, create one:
mkdir my-research-project
cd my-research-project
git init
The git init command sets up version control, which Claude Code uses to track
changes and help you undo mistakes. If you do not have git installed, see
git-scm.com/downloads.
Step 5 — Start a conversation
In the Claude Code chat panel (the one that opened when you clicked the Claude icon), type a message and press Enter. For example:
"I just opened my project folder. What files are in it?"
Claude will look at your folder and reply. From here, you can ask it to read files, write code, compile LaTeX, run Python scripts, or help you organise your work.
The most important thing to do next is create a CLAUDE.md file in your
project folder. This file tells Claude everything it needs to know about your
project every time you open it. Without it, Claude starts each session knowing
nothing about your work.
You can write it by hand — the CLAUDE.md section below explains exactly what to put in it. Or, for the fastest path, skip to Bootstrapping a new project with Claude — the next section: describe your project to Claude in plain language, point it at this guide, and it will create all the files and install all the tools for you.
A note on cost
Claude Code charges per message based on the length of the conversation. A typical research session (a few hours of active use) costs roughly $1–5 USD in API tokens, depending on how much context is loaded and how many files are read.
You can track your usage at console.anthropic.com/usage. If you have a Claude Pro subscription, Claude Code usage is included in that plan.
Bootstrapping a new project with Claude
The fastest path from nothing to a fully configured research project is to let Claude do the setup for you — once. Here is how.
This section mentions pieces that are explained later in the guide — CLAUDE.md, skills, hooks. You do not need to understand them first: set the project up now, and learn what each piece does in Part II as you start working.
Step 1 — Gather your materials. Create a folder for the project. Put in it whatever you have: a LaTeX draft, reference PDFs, computation scripts, handwritten notes scanned to PDF, a plain-text outline. It does not matter how raw the state is.
Step 2 — Open the folder in VS Code and start a Claude Code session.
Step 3 — Describe the project. In your first message, tell Claude everything it would need to know. Cover:
- What the project is and what mathematical or scientific object you are studying
- The open question you are working toward
- The files you added and what each one is for
- The notation and conventions you use (including sign and normalisation choices)
- Your preferences: how detailed should LaTeX write-ups be, what is your git remote setup, do you use Mathematica or Python for numerics, etc.
- Anything else you would put in a CLAUDE.md if you were writing it by hand
Do not worry about structure. Write it conversationally. The more you say, the better the generated CLAUDE.md will be.
Step 4 — Paste the setup message. One message does the whole setup. It is written to force Claude to read your repo and your description and generate real content — not to paste templates. The distinction in the prompt between "copy verbatim" and "generate from what I told you" is the part that matters; do not soften it.
I want to set up this project using the workflow at https://github.com/Mexregkan/claude-for-researchers/. First read that repo's
starter/directory so you know the exact structure of every file. Then:Copy these verbatim — they are generic infrastructure and need no edits:
.claude/settings.json(fromstarter/.claude/settings.json).claude/hooks/pre-compact.shand.claude/hooks/promise-checker.sh.gitignore(fromstarter/.gitignore)Install skills by relevance — NOT all of them. The four generated files below are universal; skills are not. From my project description, decide which of these apply to this project:
latex-compile,sync-brief— every project (they serve the core files)verify-citation— only if I will cite literaturereality-check,cross-validate— if Claude will be doing derivations or calculations whose correctness matters (default: yes for research)nb-to-wolfbook,sync-wb-nb,wolfram-headless— only if I use Mathematica (wolfram-headlessalso applies to any heavy headlesswolframscriptuse)overleaf-sync— only if I mentioned a shared Overleaf projectFor each skill you selected, check
~/.claude/skills/<name>/SKILL.mdfirst:
- Exists globally and covers the same ground: skip — the global skill is already available in every project, a local copy adds nothing.
- Exists globally but the starter version is meaningfully more complete (has explicit error-handling rules, severity thresholds, or hard constraints the global version lacks): install the starter version locally and report the key differences in one sentence so I can decide whether to update my global skill too.
- Does not exist globally: copy from
starter/.claude/skills/<name>/SKILL.md. End with a one-line summary in three groups: not relevant to this project (not installed), found globally (skipped), installed locally (and why).If the project runs numerics, also create the empty staging folders
numerics/generated/andfigures/generated/— the CLAUDE.md you generate below explains their role (AI-produced outputs pending my review).Only if I told you I push to two git remotes (e.g. personal GitHub + institution GitLab): copy
starter/scripts/git-push-both.shtoscripts/, and enable the dual-remote mirror hook by replacing the emptyPostToolUsearray in.claude/settings.jsonwith the block documented in that file's_comment_posttooluse. Do NOT enable it for a single-remote project — it would fail silently. (The hook ships OFF by default for exactly that reason.)Generate these from what I told you at the start of this session. All four files below must be customised to THIS project. Use the starter files ONLY for their structure — preamble, macros, section layout, comment style — and replace every example sentence and every bracketed stub (
[Project Title],[Statement of main result.],[SHORT DESCRIPTIVE NAME],[e.g., ...], etc.) with real content drawn from my description. Do not leave a single bracketed placeholder anywhere. If you genuinely lack the information for a section, ask me — do not invent it and do not leave the template text in place.
CLAUDE.md— based onstarter/CLAUDE.md. Fill in Goal, Files, Conventions, Current status, my real git remotes, my notation, and my numerics setup, all from what I described.workbook.tex— keep the starter's preamble and theorem environments, set the real title and author, write a real introduction and a real conventions section from my description, and make sections for the actual topics of this project. Short is fine; generic is not — it must be about MY project.brief.tex— keep the starter's preamble and the\established/\conjectured/\opencolour macros, set the real title and author, then fill the Main results, Conventions, and Open problems sections with this project's actual current state. Tag each item[ESTABLISHED],[CONJECTURED], or[OPEN]. Delete the example theorem/definition stubs — do not ship them.next-session-prompts.md— keep the structure (top task block + DONE log), then write a real first task: its context, the precise what-to-do (naming the file and section), and a concrete success criterion — all for this project. Replace thePrompt A/Prompt Bexample text entirely; leave the DONE log empty since nothing is done yet.If
workbook.tex,brief.tex, or any target file already exists, do NOT overwrite it — tell me and stop.Create all of the above with the Write tool. Then run these install commands — I will approve the few one-time permission prompts they trigger:
brew install rtk && rtk init -g --auto-patchmkdir -p ~/.claude/skills/pdf && curl -o ~/.claude/skills/pdf/SKILL.md https://raw.githubusercontent.com/anthropics/skills/main/skills/pdf/SKILL.md(skip if~/.claude/skills/pdf/SKILL.mdalready exists)code --install-extension wolfbook.wolfbook(only if I use Mathematica)curl -fsSL https://raw.githubusercontent.com/Mexregkan/claude-for-researchers/main/scripts/patch-wolfbook-splitter.py | python3 -(only if I use Mathematica — fixes Wolfbook's comment-split bug; reload the VS Code window after)curl -fsSL https://raw.githubusercontent.com/Mexregkan/claude-for-researchers/main/scripts/apply-notebook-ux.py | python3 -(only if I use Mathematica — notebook word wrap + Mathematica-style section-folding keybindings; reload the VS Code window after)git init(only if this is not already a git repo)
Step 5 — Approve the one-time install prompts. Claude writes all the files silently, then runs the four install commands. Those few commands will ask for permission in this first session only (see the note below). Approve them.
Step 6 — Review what Claude produced. Read the generated CLAUDE.md,
workbook.tex, and brief.tex. The infrastructure (settings, hooks, skills) is
correct by construction. The parts that need your eyes are the domain-specific
ones — Conventions, Current status, the introduction — because those depend on
your knowledge. If Claude left anything generic or got a convention wrong, fix it
now, and you are ready to begin.
Alternative: scripted setup
If you prefer answering questions over pasting a prompt, scripts/bootstrap.sh
does the same setup deterministically. Run it from your new project folder:
curl -fsSL https://raw.githubusercontent.com/Mexregkan/claude-for-researchers/main/scripts/bootstrap.sh | sh
It asks for the project title, author, numerics engine, and whether you cite
literature, want the validation skills, or pair with a shared Overleaf project.
It then installs the universal core — CLAUDE.md plus the workbook /
brief / next-session-prompts trio, with your title and author already filled
in — and only the skills your answers make relevant, skipping any skill
already in your global ~/.claude/skills/. It never overwrites an existing
file, creates the generated/ staging folders when you run numerics, and
offers git init.
The script handles structure; it cannot write your introduction or conventions. It finishes by printing the short prompt to paste into your first Claude session, which fills the remaining bracketed stubs from your project description. Both routes end in the same place — with the prompt, Claude makes the relevance decisions from your description; with the script, you make them by answering questions.
If you have existing Mathematica notebooks or scripts, run /nb-to-wolfbook on
them after setup is complete. Point it at a file or a whole directory and it will
convert everything to Wolfbook's .wb format in one step — re-run the cells
afterwards to regenerate output.
Why the install commands prompt (once). The settings.json Claude just wrote
allows ordinary commands to run freely and asks before anything dangerous (rm,
mv, git reset --hard, sudo, …) — it blocks nothing outright, so you stay in
control without ever being stuck. That is the behaviour you want: Claude runs LaTeX,
Python, and git without interrupting you, and only pauses before something risky.
But Claude Code reads settings.json once, at session start, so it does not take
effect until your next session. That is why the four install commands in this very
first session ask for permission. Approve them; from the next session on, routine
commands won't prompt you again.
This works because Claude Code can read a GitHub repository, run shell commands, and
write files, and because the guide it is reading contains explicit templates and
instructions. Filling those templates with your project — turning a description into
a working CLAUDE.md, workbook.tex, and brief.tex — is exactly the kind of
structured work Claude does reliably. The research that follows is yours.
Quick-start flowcharts
Visual overviews of the two key workflows. Scan these before reading the full guide.
| Setting up a new project | Each working session |
|---|---|
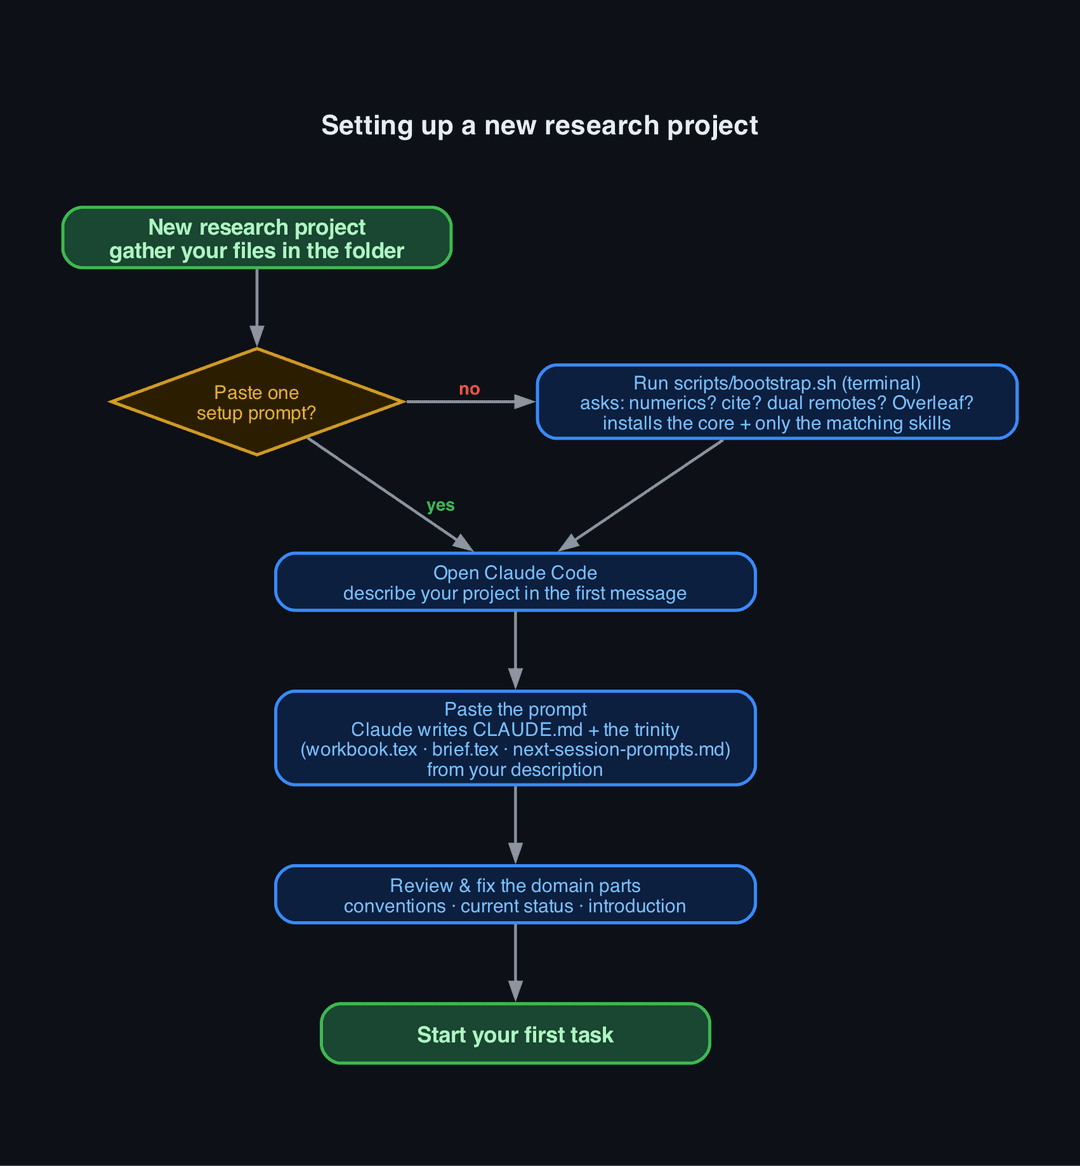 |  |
Green = start/end · Blue = action · Gold = decision · Red label = no path · Green label = yes path
The right mental model
Before setting anything up, it helps to understand what kind of tool Claude Code actually is, because the wrong mental model leads to the wrong workflow.
Claude Code is not a research collaborator. It does not have intuition, taste, or genuine understanding of your field. It has read an enormous amount of text, including mathematical papers, and can pattern-match on that reading very effectively. That is genuinely useful, but it is different from understanding.
Claude Code is not an intelligent assistant that figures things out. It follows instructions. If your instructions are vague, the result will be vague. If your instructions are precise — which file, which section, which formula, what to check — the result will be precise and fast.
Claude Code is a very capable junior research assistant. It can:
- Write, edit, and compile LaTeX faster than you can, including tracking down obscure errors
- Write Python or Mathematica computation scripts from a clear specification
- Keep careful records — updating documents, maintaining logs, tracking what was tried
- Read and navigate a large document without losing track of the structure
- Do tedious mechanical work (checking all cases of a formula, renaming things consistently) without making the transcription errors a human would make
What it cannot do:
- Notice when a mathematical argument is wrong on its own terms (it may reproduce the error confidently)
- Supply physical intuition or mathematical taste
- Know when it is out of its depth (it will not tell you unprompted)
- Remember anything reliably between sessions without explicit help
The workflow described in this guide is designed to make the "capable junior assistant" model actually work in practice: it keeps Claude well-informed about your project, tells it precisely what to do, and keeps you in control of all decisions that matter.
Part II: The core workflow
The heart of the guide: how to organise a long research project so that every Claude session is productive. This part is for everyone — but you do not need to read it all on day one. Start working, and come back to each topic as it becomes relevant.
CLAUDE.md: the most important file
What it is
CLAUDE.md is a plain text file that lives at the root of your project directory.
Claude Code reads it automatically at the start of every session, before you type
anything. It is the primary way you communicate standing instructions, context,
and conventions to Claude.
Every session, Claude starts with no memory of previous sessions. Without CLAUDE.md, you spend the first 20 minutes of every session re-explaining your project. With a good CLAUDE.md, Claude starts the session already knowing:
- What the project is and what you are trying to achieve
- The notation and conventions you use
- Where everything is and which file is authoritative
- What has been established and what is still open
- Exactly what to do next
- How you want it to behave (chat style, writing style, what tools to use)
A good CLAUDE.md is the difference between a session that is productive from the first message and one that wastes half an hour on orientation.
Why it is the most important file
Every other practice in this guide — brief.tex, the session log, the
skills — feeds into the session through CLAUDE.md. If CLAUDE.md is wrong, incomplete,
or out of date, every session will be off. No amount of clever tooling fixes a bad
CLAUDE.md.
Conversely, a well-maintained CLAUDE.md is so effective that experienced Claude Code users often say it is the one practice that most clearly separates productive from unproductive research workflows.
What to put in it
A CLAUDE.md for a research project should contain the following sections.
1. Project goal
One or two paragraphs. What is this project? What is the mathematical or scientific object you are studying? What is the open question you are working toward?
Be precise. Not "I am studying Eisenstein series" but "I am computing the regularised integral of a product of four Eisenstein series over the modular fundamental domain as a function of their spectral parameters, using the Rankin–Selberg method." The more specific you are, the more accurately Claude understands the scope of the project and can judge whether something is relevant.
2. File map
A list of every file or directory Claude needs to know about, with one sentence each explaining what it is and what it is for. Explicitly say which file is authoritative.
Example:
- brief.tex — 20-page self-contained reference; READ FIRST in every new session.
  Contains all current results, key formulas, and open problems. No proofs.
- workbook.tex — the full working record (~100–300 pages). Every proof, derivation,
  failed attempt, and discussion goes here in complete detail. Too large to read in
  full — grep or use section labels.
- next-session-prompts.md — task log. Top = next task; bottom = DONE log.
- numerics/ — computation scripts. numerics/README.md explains each file.
3. Conventions
The exact notation and conventions Claude must get right. This is critical for mathematical and physics projects, where a sign error or wrong normalisation is not a style issue but a factual error.
Include:
- Definitions of every symbol that appears in your calculations
- Which normalisation convention you use (there are often several in the literature)
- Sign conventions
- Which branch of a function you take
- Any non-standard notation
Example:
- ξ(s) = π^{-s/2} Γ(s/2) ζ(s). Functional equation: ξ(s) = ξ(1-s).
  Simple poles at s=0 (residue -1/2) and s=1 (residue +1/2).
- E*_s = ξ(2s) E(z,s) is the completed Eisenstein series. NOT the same as E(z,s).
  Simple poles at s=0,1 with residues ∓1/2.
- M_3(μ_0,μ_1,μ_2,μ_3) = the depth-three Mellin transform. The variable s = μ_0
  is the Mellin variable; μ_1,μ_2,μ_3 are the spectral parameters of the three
  Eisenstein factors.
- ∏ξ always means ∏_{i=0}^3 ξ(2μ_i).
Do not assume Claude knows what your symbols mean "from context." Write the conventions explicitly every time.
4. Current status
A short, honest summary of where the project is right now. Not history — current state. One screenful. This is the section you update most often.
It should answer:
- What has been established (what is rigorous and complete)?
- What is the most recent result?
- What is the exact next step?
Example structure:
## Current status

**Last result (2026-06-04):** The discrete Maass block D was observed directly
at (μ_0,μ_1,μ_2,μ_3) = (12,2,2,2). Residual R = M_3 − 2(½∏ξ·ΣΞ + ½∏ξ·C_cont)
= 2.64e-9 agrees with ∏ξ·D to 0.014% with no free parameters (L-values from LMFDB).

**Established:**
- All 8 boundary residues Res_{μ_i=1} = +½Z, Res_{μ_i=0} = -½Z (theorem)
- All 16 interior pole hyperplanes identified (pinch analysis)
- Interior residue formula R_σ = -∏ξ(2μ_i - [σ_i=-1]) (numerically validated at 3 tuples)
- M_3 is NOT a Langlands-Shahidi ratio (E ≠ 0 confirmed)

**Open:**
- Deep DK-derivation sections need the κ=1 factor-2 audit (~90 instances)

**Next step:** See next-session-prompts.md Prompt A.
5. Chat formatting
Tell Claude explicitly how you want math written in chat. This matters because
Claude Code's chat interface does not render LaTeX. If Claude writes
$\xi(s) = \pi^{-s/2}\Gamma(s/2)\zeta(s)$ in a chat reply, you see raw LaTeX,
not a formula.
The standard instruction:
## Chat formatting (NON-NEGOTIABLE)
In chat replies, do NOT use LaTeX markup ($...$, \frac{}{}, \xi, \Gamma, etc.).
Write math in plain Unicode: ξ, μ, Γ, ζ, ∑, ∏, ∫, √, ½, →, ≈, ≤, ⇒.
Single-character subscripts and superscripts: use Unicode — M₃, μ₀, sᵢ, x², yⁿ.
Multi-character sub/superscripts: use underscore/caret notation — M_{ab}, e^{-π t}, τ^{-2}.
LaTeX belongs ONLY inside .tex files.
Mark this as NON-NEGOTIABLE. Without this instruction, Claude will revert to LaTeX in chat after a few exchanges.
6. Open tasks
The current ranked list of things to do. This section is what Claude looks at to decide what to work on next when you say "continue" or "pick up where we left off."
Keep it short — two or three items. The full task log lives in next-session-prompts.md.
This section is just the top of the queue.
7. Skills
List every skill you have defined and what it does. See the Skills section below for what skills are. A one-line description per skill is enough here.
Example:
## Skills
- /latex-compile — compile workbook.tex or brief.tex, fix errors and overfull boxes.
- /sync-brief — propagate new results from workbook.tex to brief.tex.
- /verify-residue — check a specific residue computation against the formula.
8. Writing style for your workbook.tex
If Claude is helping you write or edit your workbook.tex, tell it explicitly what level of detail you expect. Researchers have very different preferences, and Claude's default is far too terse for most mathematical writing.
Example (verbose style):
## Writing style in workbook.tex (NON-NEGOTIABLE)
workbook.tex is the authoritative, comprehensive record. Show every step of every
calculation. State each substitution, each application of the functional equation,
each sign and factor-of-two choice — explicitly, in its own sentence. Never collapse
a multi-step manipulation into "one finds" or "a short computation gives." If in
doubt, over-explain. A reader must be able to reconstruct every result from workbook.tex
alone, with no external notes and no gaps.
If you prefer concise theorem-proof style instead, say that. The point is to say something explicit rather than leaving it to Claude's default.
9. Numerics configuration
If you run computations, tell Claude the setup:
## Numerics
- Primary engine: Python + mpmath (arbitrary precision)
- Precision: mp.dps = 30 unless stated otherwise
- venv: numerics/venv/ — run as numerics/venv/bin/python numerics/script.py
- Route long-running output to: numerics/run.log
- Mathematica (wolframscript): for symbolic verification only, not primary
10. Git configuration
Tell Claude your exact remote setup:
## Git
- Remote 'github': https://github.com/YOUR_USER/YOUR_REPO.git (primary, main tracks it)
- Remote 'gitlab': [email protected]_INSTITUTION.ac.uk:YOUR_ID/YOUR_REPO.git (institution mirror)
- Push: git push github main (hook auto-mirrors to gitlab)
- Commit author: YOUR_NAME <your-email>
- No Co-Authored-By trailers in commits.
Without this, Claude will push to the wrong remote or use the wrong identity.
What NOT to put in CLAUDE.md
Not a logbook. CLAUDE.md is a current-state snapshot, not a history. When a
task is done, move it to the DONE log in next-session-prompts.md. When a status
changes, update the section in place — do not append a new dated block. Appended
blocks accumulate, CLAUDE.md grows, Claude reads old states as if they were current,
and sessions degrade.
Not a full exposition. CLAUDE.md should be navigable in one or two screenfuls per section. Detailed content belongs in your brief.tex (see below). CLAUDE.md points Claude to brief.tex; it does not replace it.
Not speculative or in-progress work. Only write what is established. In-progress
calculations belong in next-session-prompts.md. A CLAUDE.md that says something is
established when it is not will cause Claude to treat it as proven and build on it.
How to maintain CLAUDE.md
The most important habit: update the "Current status" and "Open tasks" sections before ending every session. This takes five minutes and saves thirty minutes of re-orientation next session.
Before closing Claude Code:
- Change "last result" to what you just found
- Move completed items out of "Open tasks" to the DONE log in
next-session-prompts.md - Write the next open task clearly
If you forget to do this, the next session starts from the wrong state. If this happens repeatedly, sessions become progressively less useful.
The pre-compact hook (see Settings and hooks) automatically
stamps CLAUDE.md with a timestamp when the context window fills up, so you can
see exactly when a compaction happened and use next-session-prompts.md to re-orient.
Common CLAUDE.md mistakes
Too long. If CLAUDE.md is more than 5–6 screenfuls, Claude spends too much context on it. Move detailed exposition to brief.tex. Keep CLAUDE.md as a navigation index and current-status snapshot.
Not updated. A CLAUDE.md that has not been updated for a week is misleading. Claude will work from the old state as if it were current.
Wrong status. Marking something as established when it is only conjectured, or missing a correction to an earlier result. Claude will confidently build on wrong premises.
No conventions section. Without conventions, Claude will guess what your symbols mean. It will often guess wrong in exactly the way that is hardest to catch — a plausible-looking sign or normalisation error.
Instructions given once and forgotten. Things like "write math in plain Unicode in chat" or "show every step in workbook.tex" need to be in CLAUDE.md permanently, not said once in conversation. Claude does not remember conversation instructions between sessions.
The dual-document pattern: workbook.tex and brief.tex
The problem
Mathematical and physics research projects involve long documents. A paper draft, after a few months of work, might be 150 to 300 pages. Claude Code has a finite context window. When your workbook.tex exceeds what fits in context, something breaks: Claude can no longer read the whole document, and sessions begin to degrade — Claude forgets earlier results, contradicts itself, misses constraints that were established weeks ago.
You cannot solve this by making Claude read the document in pieces each session. That takes too long and the pieces do not form a coherent picture. And you cannot solve it by making CLAUDE.md longer — a CLAUDE.md that attempts to summarise a 200-page paper is itself too long and misses exactly the details that matter.
The solution: two documents with different purposes
Maintain two documents in parallel:
The workbook (workbook.tex) is your full, detailed working record — a research
journal in LaTeX. Everything goes here: proofs, derivations, failed attempts,
discussions, corrections, numerical experiments, and your thinking as it develops.
This document is deliberately verbose. It is not a paper draft and not what
you submit for publication — it is the place where you work things out in writing,
for a reader (you, months later, or Claude) who wants to see every step. Claude does
not read it in full each session — it is too long. Instead, Claude navigates it with
grep and targeted reads when it needs a specific equation or section.
The brief (brief.tex) is a short (15–30 pages / 1000–3000 lines)
self-contained reference. It contains the current state of the project: what is
established, what the key formulas are, what is open, and where to find things in
workbook.tex. It contains no proofs, no derivations, no history. Claude reads it
at the start of new sessions as the primary orientation source. Because it states
results cleanly without the working-out, brief.tex — not workbook.tex — is the
document closest to an eventual published paper.
brief.tex acts as a compressed session memory. When workbook.tex has grown
beyond what fits in context, Claude reads brief.tex and stays accurately oriented.
What to put in workbook.tex
Everything. workbook.tex is the authoritative record, and "authoritative"
means complete. There are no results too numerical or too routine to include in full.
If a calculation was worth doing, it is worth recording in full detail.
Specifically:
- Every theorem and proposition with a complete proof
- Every formula with the full derivation shown step by step
- Every numerical result: what was computed, the method, the precision, the validation, and any caveats
- Every correction: if you found an error and fixed it, the corrected statement and an explicit note that the old version was wrong
- Every failed attempt that taught you something, with an explanation of why it failed
The reason for this completeness is practical, not pedantic. A result you "know" but did not write down will be forgotten when the context rolls over. The main document is what survives.
Structuring workbook.tex so Claude can navigate it
Claude does not read workbook.tex from top to bottom each session. It navigates
with grep and targeted reads, jumping to whatever section is relevant right now.
Two things make this work or fail:
Cross-references. Use \label and \ref (or \eqref) liberally — more than
you would for human readers. Every theorem, equation, section, and subsection
should be labelled, and results should refer to each other explicitly. When Claude
reads Section 4 and needs to know what Proposition 2.3 says, a cross-reference
tells it where to look. Without them, Claude either guesses or misses the
connection entirely.
Section structure. Flat documents — everything in one or two large sections — are hard for Claude to navigate. A clear, deep hierarchy (sections → subsections → subsubsections, with meaningful names) lets Claude find the right part of the document without reading everything around it.
Both of these are also just good LaTeX practice. They cost almost nothing when you write them and save significant friction later.
Corrections must replace, not append
This is a non-negotiable rule: if you discover that something in workbook.tex is
wrong, correct it in place. Do not write a new paragraph further on saying
"earlier I claimed X but actually Y." Delete or replace the wrong content.
The reason is specific to how Claude uses the document. Claude reads different parts
of workbook.tex in different sessions — it does not read everything. If the wrong
version stays in the file and the correction is only a few pages later, there is a
real risk that Claude reads the wrong statement in a future session and never
encounters the correction. It will then work from incorrect information, confidently.
In-place corrections also produce a cleaner document for human readers. There is no legitimate reason to keep wrong content in an authoritative record.
What to put in brief.tex
Only what is established and currently relevant. The brief.tex is a snapshot of the current state of knowledge about the project, compressed to what is essential.
Include:
- Every established theorem and proposition, stated precisely (without proof)
- Every key formula, with the exact normalizations and signs you use
- A cross-reference to workbook.tex for each result (section label or equation name) so Claude can navigate there when it needs the derivation
- The current status: what is proved, what is conjectured, what is open
- Open problems, ranked by importance
- A concise conventions section
- Recent corrections (the corrected statement, clearly marked as corrected)
Exclude:
- Proofs and derivations
- Pedagogical examples and motivation
- History (how you arrived at results, what you tried first)
- In-progress or speculative work
- Anything that is not yet established
How to structure brief.tex
A structure that works well:
§1  Abstract / main results
    The 2–3 key theorems stated precisely. Someone reading only this
    section should know what the project has established.

§2  Conventions and definitions
    Every symbol defined, with the exact normalisation used.
    This section prevents Claude from guessing.

§3–N  Results by topic
    One section per topic. Theorem statement, key formula,
    cross-reference to workbook.tex.
    Mark each result: ESTABLISHED / CONJECTURED / OPEN.

§N+1  Numerical results
    Exact computed values, method used, what was validated.

§N+2  Open problems
    Ranked list. "Item 1 is the next thing to prove."
The sync discipline
The brief.tex and workbook.tex will drift apart unless you actively maintain them. Two situations require a sync:
After a new result is established: Add the theorem statement (not the proof) to the brief.tex. Update the status of related open problems. This takes five minutes and saves the result from being lost in workbook.tex.
After a correction: If you find that something in brief.tex is wrong, fix it immediately. A wrong brief.tex is worse than no brief.tex — Claude will confidently work from incorrect information.
The /sync-brief skill in this repository automates part of this: it classifies
which changes in workbook.tex are "load-bearing" (new theorems, corrected formulas)
and prompts you to propagate them.
What "load-bearing" means
Not every change to workbook.tex needs to go into brief.tex.
Propagate to brief.tex:
- A new theorem or proposition (statement only)
- A corrected formula (sign, factor, argument — whatever changed)
- A result that changes the status of an open problem
- A new definition that other results depend on
Do not propagate:
- A new proof of an already-stated theorem
- A pedagogical re-derivation of an existing result
- A reorganisation or renaming that does not change content
- Footnotes, remarks, summary subsections
When in doubt, propagate. It is easier to trim an unnecessary update than to recover a missing one.
Common mistakes with the dual-document pattern
The brief.tex grows. When it exceeds 30 pages, it starts to function like a smaller version of workbook.tex — still too large for an orienting read. Prune it: collapse routine results into tables, remove historical context, cut anything that is not load-bearing for future work.
In-progress work ends up in brief.tex. brief.tex
contains only what is established. When you are in the middle of a calculation, that
belongs in next-session-prompts.md, not in brief.tex.
Syncing stops. A brief.tex that is two months out of date is useless. Treat syncing as part of the cost of every new result, not as a separate task.
The brief.tex is not self-contained. If someone (or Claude) reading only brief.tex cannot understand what the project has established, it is not doing its job. Every result should be understandable without reference to workbook.tex, even if workbook.tex is where the proof lives.
Corrections in workbook.tex are appended rather than replaced. This is the most dangerous mistake. If you write "earlier I said X, but actually Y" at the end of a section, a later Claude session may read only the beginning of that section and work from X, never seeing the correction. Wrong content must be replaced in place, not annotated. See the section above on corrections.
Session continuity: next-session-prompts.md
The problem
Even with a well-maintained CLAUDE.md and brief.tex, there is context that lives only in the conversation — the details of what you just tried, why a particular approach failed, what the next micro-step is. This context does not survive between sessions. A new session starts without it.
The consequence is a common, frustrating experience: you end a session knowing exactly what to do next, then start the next session and spend 20 minutes reconstructing where you were.
The solution: a human-maintained session log
next-session-prompts.md is a file you maintain by hand. It has two sections:
The current task queue (top of the file): one to three self-contained task descriptions, written well enough that you could paste one into a new Claude session and have Claude understand exactly what to do. Each task should include:
- What you are trying to do and why it matters
- What is already known (so Claude does not re-derive it)
- The specific instruction: which file, which section, which formula, what to change
- What success looks like (a number, a passing test, a compiled document, a sentence written)
The DONE log (bottom of the file): a timestamped record of completed tasks, with results and any caveats. This is the durable history of the project. CLAUDE.md is the current-state snapshot; the DONE log is the record of how you got there.
Why this works better than relying on Claude's memory
Claude Code has an auto-memory system. It saves facts between sessions (conventions, preferences, who you are). This is useful for stable information. It is not useful for in-flight research state — what you just tried, why it failed, what the next step is.
The auto-memory system does not know the difference between "I established this
formula" and "I am currently trying to prove this formula." next-session-prompts.md
does, because you write it.
The other reason: when you write a task description carefully enough to hand it to Claude, you often clarify your own thinking in the process. The discipline of writing "here is what I want to do, here is why, here is what success looks like" is valuable independently of Claude.
Writing a good task description
The quality of the task description determines the quality of the next session.
A bad task description is vague:
"Work on the boundary residue calculation."
Claude does not know which boundary, which residue, what the current state is, or what you want to produce.
A good task description is self-contained:
Context: We are verifying the formula R_σ = -∏ξ(2μ_i - [σ_i = -1]) for the interior pole residues of M_3. We have checked it for the n_- = 1 representative at three integer tuples and it passes to ratio 1.0003.
What to do: Check the formula for the n_- = 2 representative at the integer point (μ_0,μ_1,μ_2,μ_3) = (5,4,3,2). This should give Res = -ξ(9)ξ(7)ξ(5)ξ(3). Write the residue extraction script in numerics/residue_n2.py following the pattern of residue_general.py.
Success: The computed ratio (numerical residue)/(formula value) is within 0.1% of 1.0.
Someone reading this description — Claude, or you three months from now — knows exactly what to do and how to check that it is done correctly.
The DONE log
Every completed task gets a brief entry at the bottom of the file:
### 2026-06-04 — Interior residue R_σ: n_-=1 check
Result: Ratio 1.0003 at three tuples (4,2,2,2), (5,2,2,3), (6,2,2,4).
Files changed: numerics/residue_general.py, workbook.tex sec:numStrategy:ansatzCheck
Notes: n_-=1 residue validated; other 15 hyperplanes follow by G_3 symmetry.
The DONE log is the long-term record. When you need to explain what your project established and in what order, the DONE log is where that history lives.
Session length and context limits
The context window
Every Claude session has a finite context window — the total amount of text (your messages, Claude's replies, file contents, tool outputs) that can fit in a single conversation. As the session grows, this fills up. When it gets close to the limit, Claude Code automatically compacts the session. If the session grows beyond what even repeated compaction can manage, you will see an error along the lines of "context window full" or "API context token limit reached". This is not a bug or a network problem — it means the session has accumulated more than the model can hold at once. The fix is to start a new session.
Seeing how full the window is
You do not have to guess. Two built-in commands show you, and both are read-only — they report information and never change your work, so there is no reason not to glance at them:
/contextdraws a coloured map of what is currently filling the context window — file reads, tool outputs, the conversation itself — and warns you as you approach capacity. Use it when a session starts to feel long: it tells you whether you actually need to act and what is taking up the room (often a single large file read, or a chatty command you could have routed through rtk)./usage(also/cost) shows the session's token cost and where it is going, broken down by skill, sub-agent, and tool. It is the honest scoreboard for whether the token-saving machinery — rtk, distill, condensed notes — is actually paying off.
Together they turn "is this session getting too big?" from a guess into something you can see, which is what tells you when to reach for compaction or a fresh session below.
A rule of thumb for when to act. There is no magic number, but a workable habit:
- Around 50% full, glance at
/context— not to act, but as a reminder to write anything load-bearing from the conversation intoworkbook.tex/brief.texwhile the detail is still there. - By around 70%, do something: either
/compactif you are mid-task and need to keep going, or — better for research — wrap the current sub-task and start a fresh session. Quality degrades well before the window is full, because every turn the model re-reads everything accumulated and your real signal gets diluted. - Do not wait for auto-compaction. It only fires when the window is nearly full, by which point you have already been working in the degraded zone. It is a safety net, not a target.
Two things matter more than the percentage. First, for research, prefer a fresh
session over repeated compaction. Compaction keeps only a lossy summary of the
conversation, and a subtle derivation is exactly where that summary loses the nuance.
At a natural stopping point it is better to write the next prompt into
next-session-prompts.md, start a new session, and let Claude re-load clean, high-signal
context from brief.tex — a fresh session seeded from your own curated documents beats a
70%-full compacted one almost every time. Reserve /compact for "I am in the middle of
one thing and do not want to break stride." Second, watch what is filling the window,
not just the number: 70% that is mostly one large PDF or stale command output you no
longer need is very different from 70% of dense active reasoning. /context shows you
which, so the percentage is really a trigger to look, and the breakdown tells you
whether to clear-and-reload or to write results out and start fresh.
Compaction and auto-compaction
What compaction is: when Claude Code detects that the context window is getting full, it runs a compaction step automatically. It takes the older part of the conversation, summarises it into a compact representation, and replaces the original exchanges with that summary. The recent part of the conversation is kept in full. The session continues without interruption.
What you lose: compaction preserves the facts and conclusions from earlier in
the session, but not the full detail. Nuanced reasoning, exploratory back-and-forth,
and intermediate steps that were never written anywhere else are compressed or
dropped. For software work this is usually fine. For research, it can matter: if
you worked through a subtle argument in conversation and never wrote it into
workbook.tex, compaction may reduce it to a one-line summary and lose the subtlety.
The practical implication: write important results and reasoning into your documents
before the session gets long, not after.
// faq
What is claude-for-researchers?
Practical guide and toolkit for physicists and mathematicians using Claude Code — built from months on a real research project. It is open-source on GitHub.
Is claude-for-researchers free to use?
claude-for-researchers is open-source, so it is free to use.
What category does claude-for-researchers belong to?
claude-for-researchers is listed under automation in the Claudeers registry of Claude-compatible tools.
// embed badge

[](https://claudeers.com/claude-for-researchers)
// retro hit counter

[](https://claudeers.com/claude-for-researchers)
// reviews
// guestbook
// related in Other
 🔓
🔓 🔓
🔓Anti-AI-slop design skill for Claude Code, Cursor, and Codex.
 🔓
🔓Open source Ghostty-based macOS terminal with vertical tabs and notifications for AI coding agents. Built for multitasking, organization, and programmability.
 🔓
🔓Huashu Design · HTML-native design skill for Claude Code · Claude Code 里 HTML 原生的设计 skill · 高保真原型 / 幻灯片 / 动画 + 20 设计哲学 + 5 维评审 + MP4 导出 · Agent-agnostic